Changing Startup Programs | ENBLE
Changing Startup Programs | ENBLE
How to Manage Startup Apps and Programs: Boost Your Computer’s Load Time
Startup apps and programs can be convenient when you want to save time by having them automatically launch when you turn on your computer. However, you might have noticed that when too many programs try to start at once, your computer takes a long time to boot up successfully. This can be frustrating, especially when you’re in a hurry or need to access your computer quickly.
But fear not! There’s a simple solution to speed up your computer’s load time and get rid of unnecessary programs in your startup. In this article, we’ll guide you through the process, step by step, for different operating systems, including Windows 11, Windows 10, macOS, Windows 8, and Windows 7. So, let’s dive in and optimize your computer’s startup!
Manage Startup Apps in Windows 11
Windows 11 introduces a revamped interface and simplified steps for managing startup apps. Here’s how you can do it:
- Select the Start menu button and choose Settings from the menu that appears.
- In the Settings menu, click on Apps.
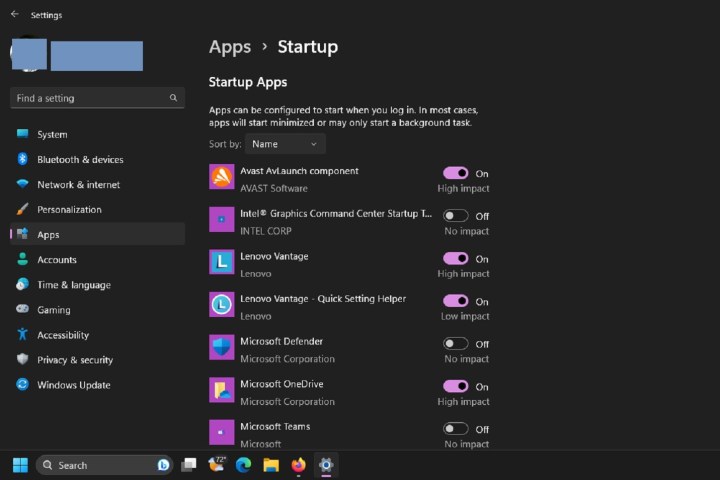
- On the Apps screen, click on Startup.
- You’ll see a list of apps with toggle switches next to them. Toggle the switch to turn on or off an app’s ability to start with Windows 11.
- The Startup screen also provides information about the impact of each app on startup time, labeling them as High, Medium, Low, or No impact. To speed up your PC at startup, consider turning off apps labeled as High impact first.

Manage Startup Apps in Windows 10
Windows 10 has a slightly different interface for managing startup apps. Here’s how you can do it:
- Launch the Task Manager by right-clicking on the taskbar and selecting it from the pop-up list, or by pressing Ctrl + Alt + Delete and choosing Task Manager.
- If the Task Manager only shows the currently open programs, select More details at the bottom to reveal a larger window with various tabs. Go to the tab labeled Startup.
- The Startup tab displays all the apps that automatically start with Windows. Enabled apps are currently active, while disabled apps are not. Select the apps you don’t need at startup and choose Disable to prevent them from launching automatically.
- Consider the “Startup impact” column, which provides information about each app’s resource usage during startup. Apps with a High impact are good candidates for disabling. If an app’s impact is None or Not measured, it’s likely not causing significant delays.
Manage Startup Apps in macOS
If you’re using macOS, you can manage startup apps by following these steps:
- Go to System Preferences, which you can find in your dock as the gear icon. Open Users & Groups and select the Lock icon to make changes, entering your password if prompted.
- Choose the appropriate user (if multiple users exist) and click on the Login Items tab at the top of the window.
- The Login Items tab displays a list of apps that open on startup. Check the apps you don’t want to start immediately.
- To remove an app from the list, click the Minus (-) sign below it. You can also add new apps by clicking the Plus (+) sign.
- If you want a fresh start with no selected apps, you can remove all of them simultaneously. This method works on macOS versions from High Sierra to Monterey.
Manage Startup Apps in Windows 8
Windows 8 provides specific steps to manage startup apps. Here’s what you need to do:
- Press the Windows key + R to open the Run box, then type “msconfig” and press Enter, or press Ctrl + Alt + Delete and select Task Manager.
- In Task Manager, click on the tab labeled Startup.
- Choose the startup program(s) you want to disable and select Disable.
- To add programs to startup, right-click on an app, select Copy, press Windows + R, enter “%appdata%”, and choose Microsoft > Windows > Start menu > Programs > Startup. Right-click in the menu and select Paste. Restart your computer for the changes to take effect.
Manage Startup Apps in Windows 7
Even if you’re still using Windows 7, you can manage startup apps with these straightforward steps:
- Select the Windows Start button and search for “MSConfig” in the programs’ text box. Open the System Configuration console.
- In the System Configuration console, go to the Startup tab to see a list of installed programs that launch at startup.
- Check the boxes for the apps you want to keep and uncheck the boxes for applications you want to disable.
- Click Apply and then close the window. Restart your device for the changes to apply.

That’s it! Follow these steps according to your operating system, and you’ll be able to manage your startup apps efficiently. Keep in mind that disabling unnecessary startup apps can significantly improve your computer’s load time and overall performance.
Remember, by reducing the number of apps launching at startup, you’ll enjoy a faster and smoother experience, with fewer delays. Take control of your computer’s startup and optimize it to suit your needs. Enjoy the benefits of a quicker boot time and an efficient computing experience!
Sources:
Anita George, Digital Trends, Windows 11 Settings Menu for Startup Apps
DigitalTrends, Startup Impact in Windows 10
Arif Bacchus, Digital Trends, macOS Startup Items Preferences
Unknown, Task Manager in Windows 8
Unknown, Windows 7 System Configuration Console


